BUILDING THE FOUNDATION FOR AN ENTERPRISE-READY DATABRICKS ENVIRONMENT

When starting with Databricks, most organizations begin with a simple sandbox environment, allowing teams to explore the platform�’s capabilities without worrying about complex configurations. However, as the organization grows and data workflows become more critical, it is essential to transition to an enterprise-ready environment that ensures stability, security, and scalability. In this article, we’ll walk through this journey – from a basic setup to an initial deployment – and offer insights into setting up code pipelines using Azure DevOps.
The Limitations of Out-of-the-Box Environments
Most often, enterprises start their Databricks journey with a straightforward, out-of-the-box environment. This typically includes:
- Single Workspace: A single Databricks workspace where all development, testing, and production activities occur.
- Basic Cluster: One or two clusters for running notebooks and experimenting with data.
- Minimal Security: Basic user access controls and no advanced security configurations.
- Manual Operations: Deployments and environment management are done manually without automation.
While this setup is sufficient for initial exploration and proof-of-concept projects, it falls short in several critical areas for enterprise-scale operations:
- Lack of Separation: Without distinct environments for development, testing, and production, there’s a risk of creating issues, such as code conflicts, data corruption, and unintentional disruptions caused by the impact that testing and development activities may have on live systems.
- Security Complexity: Having a single workspace means that all security requirements need to be applied to the services and resources individually, which significantly increases the likelihood of policy misapplication.
- Limited Scalability: Basic clusters may not handle the increased workload as your data processing needs grow.
- Security Vulnerabilities: Minimal security controls typically found in these early sandbox environments can expose sensitive data and leave your environment vulnerable to breaches.
- Collaboration Bottlenecks: A single workspace can lead to conflicts and reduced productivity as multiple teams try to work simultaneously using the same resources.
By upgrading to a more enterprise-ready environment, you address these limitations and unlock more potential for your organization.
Minimal Deployment for an Initial Setup
Before diving into the specifics of an enterprise-ready architecture, it’s crucial to understand why such a setup is necessary and the benefits it provides. An enterprise-ready Databricks environment offers:
- Enhanced Security: Properly segregated environments and fine-grained access controls protect sensitive data and ensure compliance with regulatory requirements, but in a comparatively simpler manner.
- Improved Stability: Separate workspaces for development, testing, and production minimize the risk of the different environments impacting each other.
- Increased Scalability: A well-architected environment can easily accommodate growing data volumes and user communities without compromising performance.
- Better Governance: Structured environments enable better (yet simpler) tracking, auditing, and management of data assets and user activities.
- Streamlined Workflows: Automated CI/CD pipelines and standardized processes increase efficiency and reduce the potential for human error.
- Cost Optimization: Separate cloud accounts for each environment allow for better cost allocation and optimization strategies.
With these benefits in mind, let’s review some of the key components of a minimal, yet effective enterprise-ready setup. While this may not be your final environmental architecture, it represents a mature, if small, Databricks environment that should satisfy your organization’s initial deployment.
For an initial deployment that moves beyond the sandbox, a minimal setup should include:
1. Separate Workspaces: Create distinct workspaces for development, testing, and production. This ensures that changes in development do not affect production workflows.
2. Cloud Accounts: Use separate cloud accounts or subscriptions for each environment (Dev, Test, Prod.) to enforce isolation and manage costs effectively. This greatly simplifies your data access controls while providing a highly secure separation of concerns. This also provides a simple, fit-for-purpose logging strategy whereby you can specify verbose logging in production, and none (for example) in development.
3. Cluster Policies: Implement cluster policies to control the configuration of clusters per workspace, ensuring they meet security and performance requirements for that specific environment.
4. Data Access Controls: Set up access controls to manage who can access what data, following the principle of least privilege. Use the built-in user and group management to assign permissions at the Workspace level. Further, use Unity Catalog to manage and enforce data access policies across multiple workspaces, defining access policies at the catalog (database), schema, and table levels.
5. Basic CI/CD Pipelines: Establish basic Continuous Integration/Continuous Deployment (CI/CD) pipelines to automate the deployment of notebooks, libraries, and other artifacts.
Enterprise-Ready Deployment Architecture
To illustrate how these components come together, let’s examine an example deployment architecture that addresses the needs of a growing organization. To do this, we’ve separated the environment into Workspace setup and CI/CD (Azure DevOps):
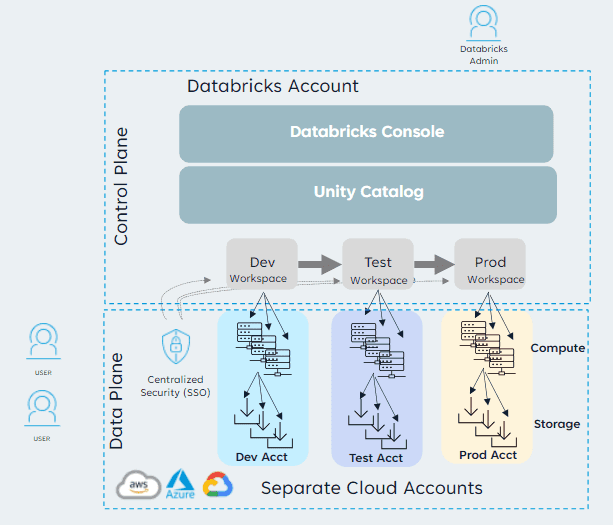
- Development Workspace: Used by data engineers and scientists to develop new features and experiments.
- Permissions: Broad access for developers, with the ability to create and modify notebooks, clusters, and jobs.
- Clusters: Dynamic, auto-scaling clusters with fewer restrictions on size and configuration to support experimentation.
- Settings: Enable collaborative features like workspace sharing and commenting.
- Testing Workspace: Mimics the production environment where new features are tested.
- Permissions: Limited to specific testing teams and automated testing processes.
- Clusters: Pre-configured clusters that match production specifications to ensure accurate testing.
- Settings: Stricter controls on cluster creation and job scheduling to simulate production constraints.
- Production Workspace: Runs stable, tested data pipelines and applications that are critical to business operations.
- Permissions: Highly restricted access, typically limited to operations teams and automated deployment processes.
- Clusters: Optimized, high-performance clusters with strict policies on size, runtime versions, and allowed libraries.
- Settings: Rigorous monitoring, alerting, and audit logging to ensure reliability and compliance.
Setting Up Code Pipelines Using Azure DevOps
To streamline your deployment process and ensure consistency across environments, setting up code pipelines is crucial. Here is a step-by-step guide to getting started with Azure DevOps:
Step 1: Set Up Repositories
Create Repos: Create separate repositories for your notebooks, libraries, and infrastructure as code (e.g., Terraform scripts).
Organize Code: Organize your codebase to separate development, testing, and production branches.
Example repository structure:
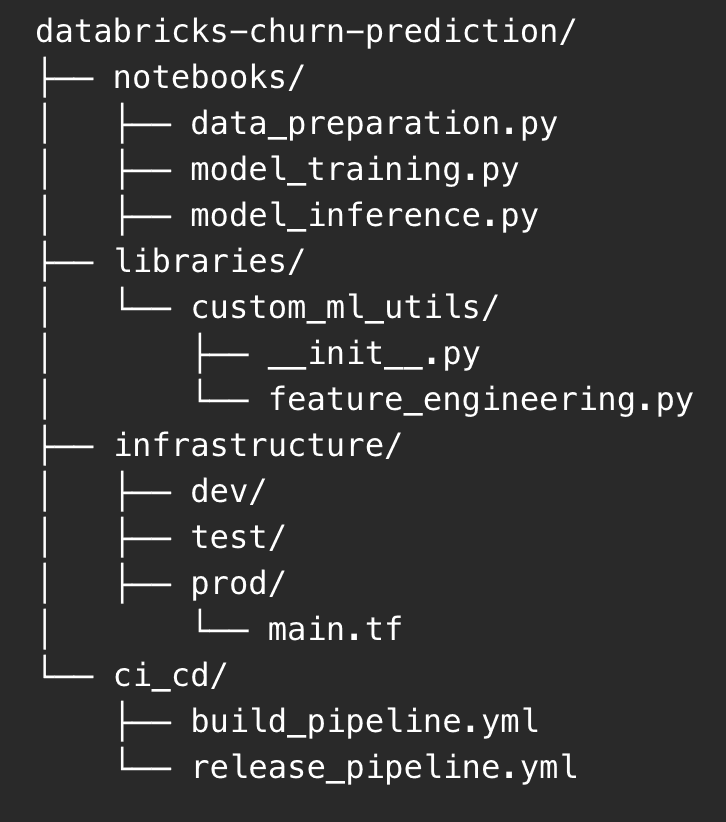
This structure separates concerns and allows for easier management of different components of your Databricks project.
Step 2: Define Build Pipelines
Build Definitions: Create build pipelines in Azure DevOps to package your notebooks and libraries.
Continuous Integration: Configure the pipelines to trigger on code commits to automatically run tests and validate changes.
Example Azure DevOps build pipeline in YAML:
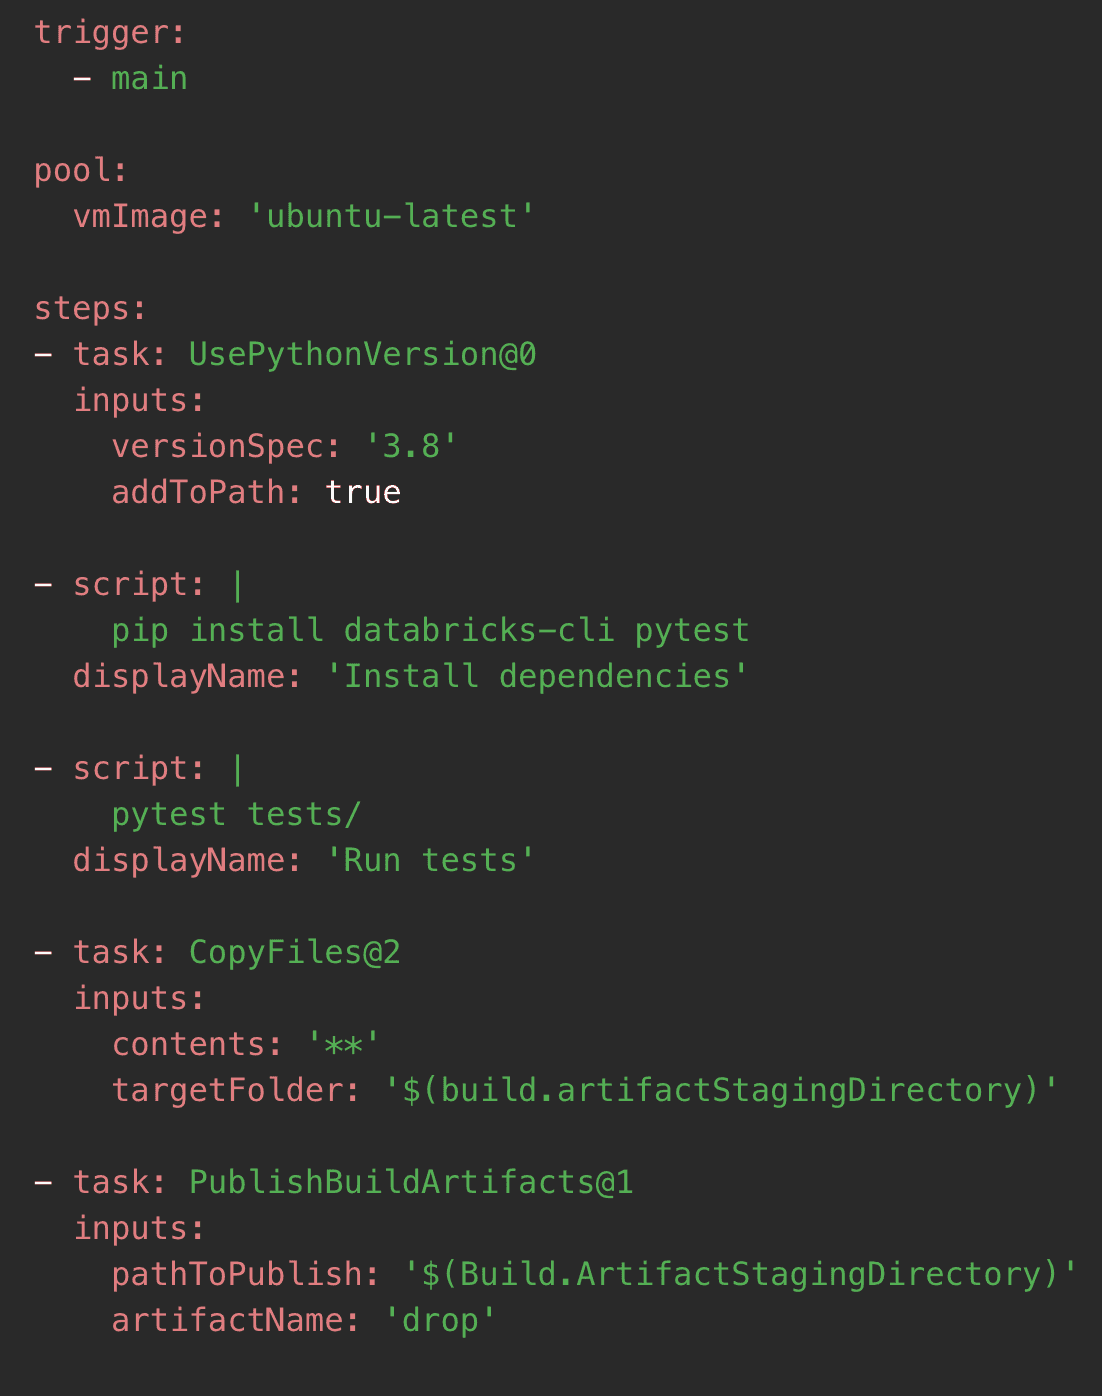
This pipeline installs necessary dependencies, runs tests, and packages the code for deployment.
Step 3: Configure Release Pipelines
Release Definitions: Create release pipelines to deploy artifacts from the build pipeline to Databricks workspaces.
Environment Stages: Define stages in your release pipeline for development, testing, and production environments.
Approval Gates: Implement approval gates to require manual or automated checks before promoting code to the next environment.
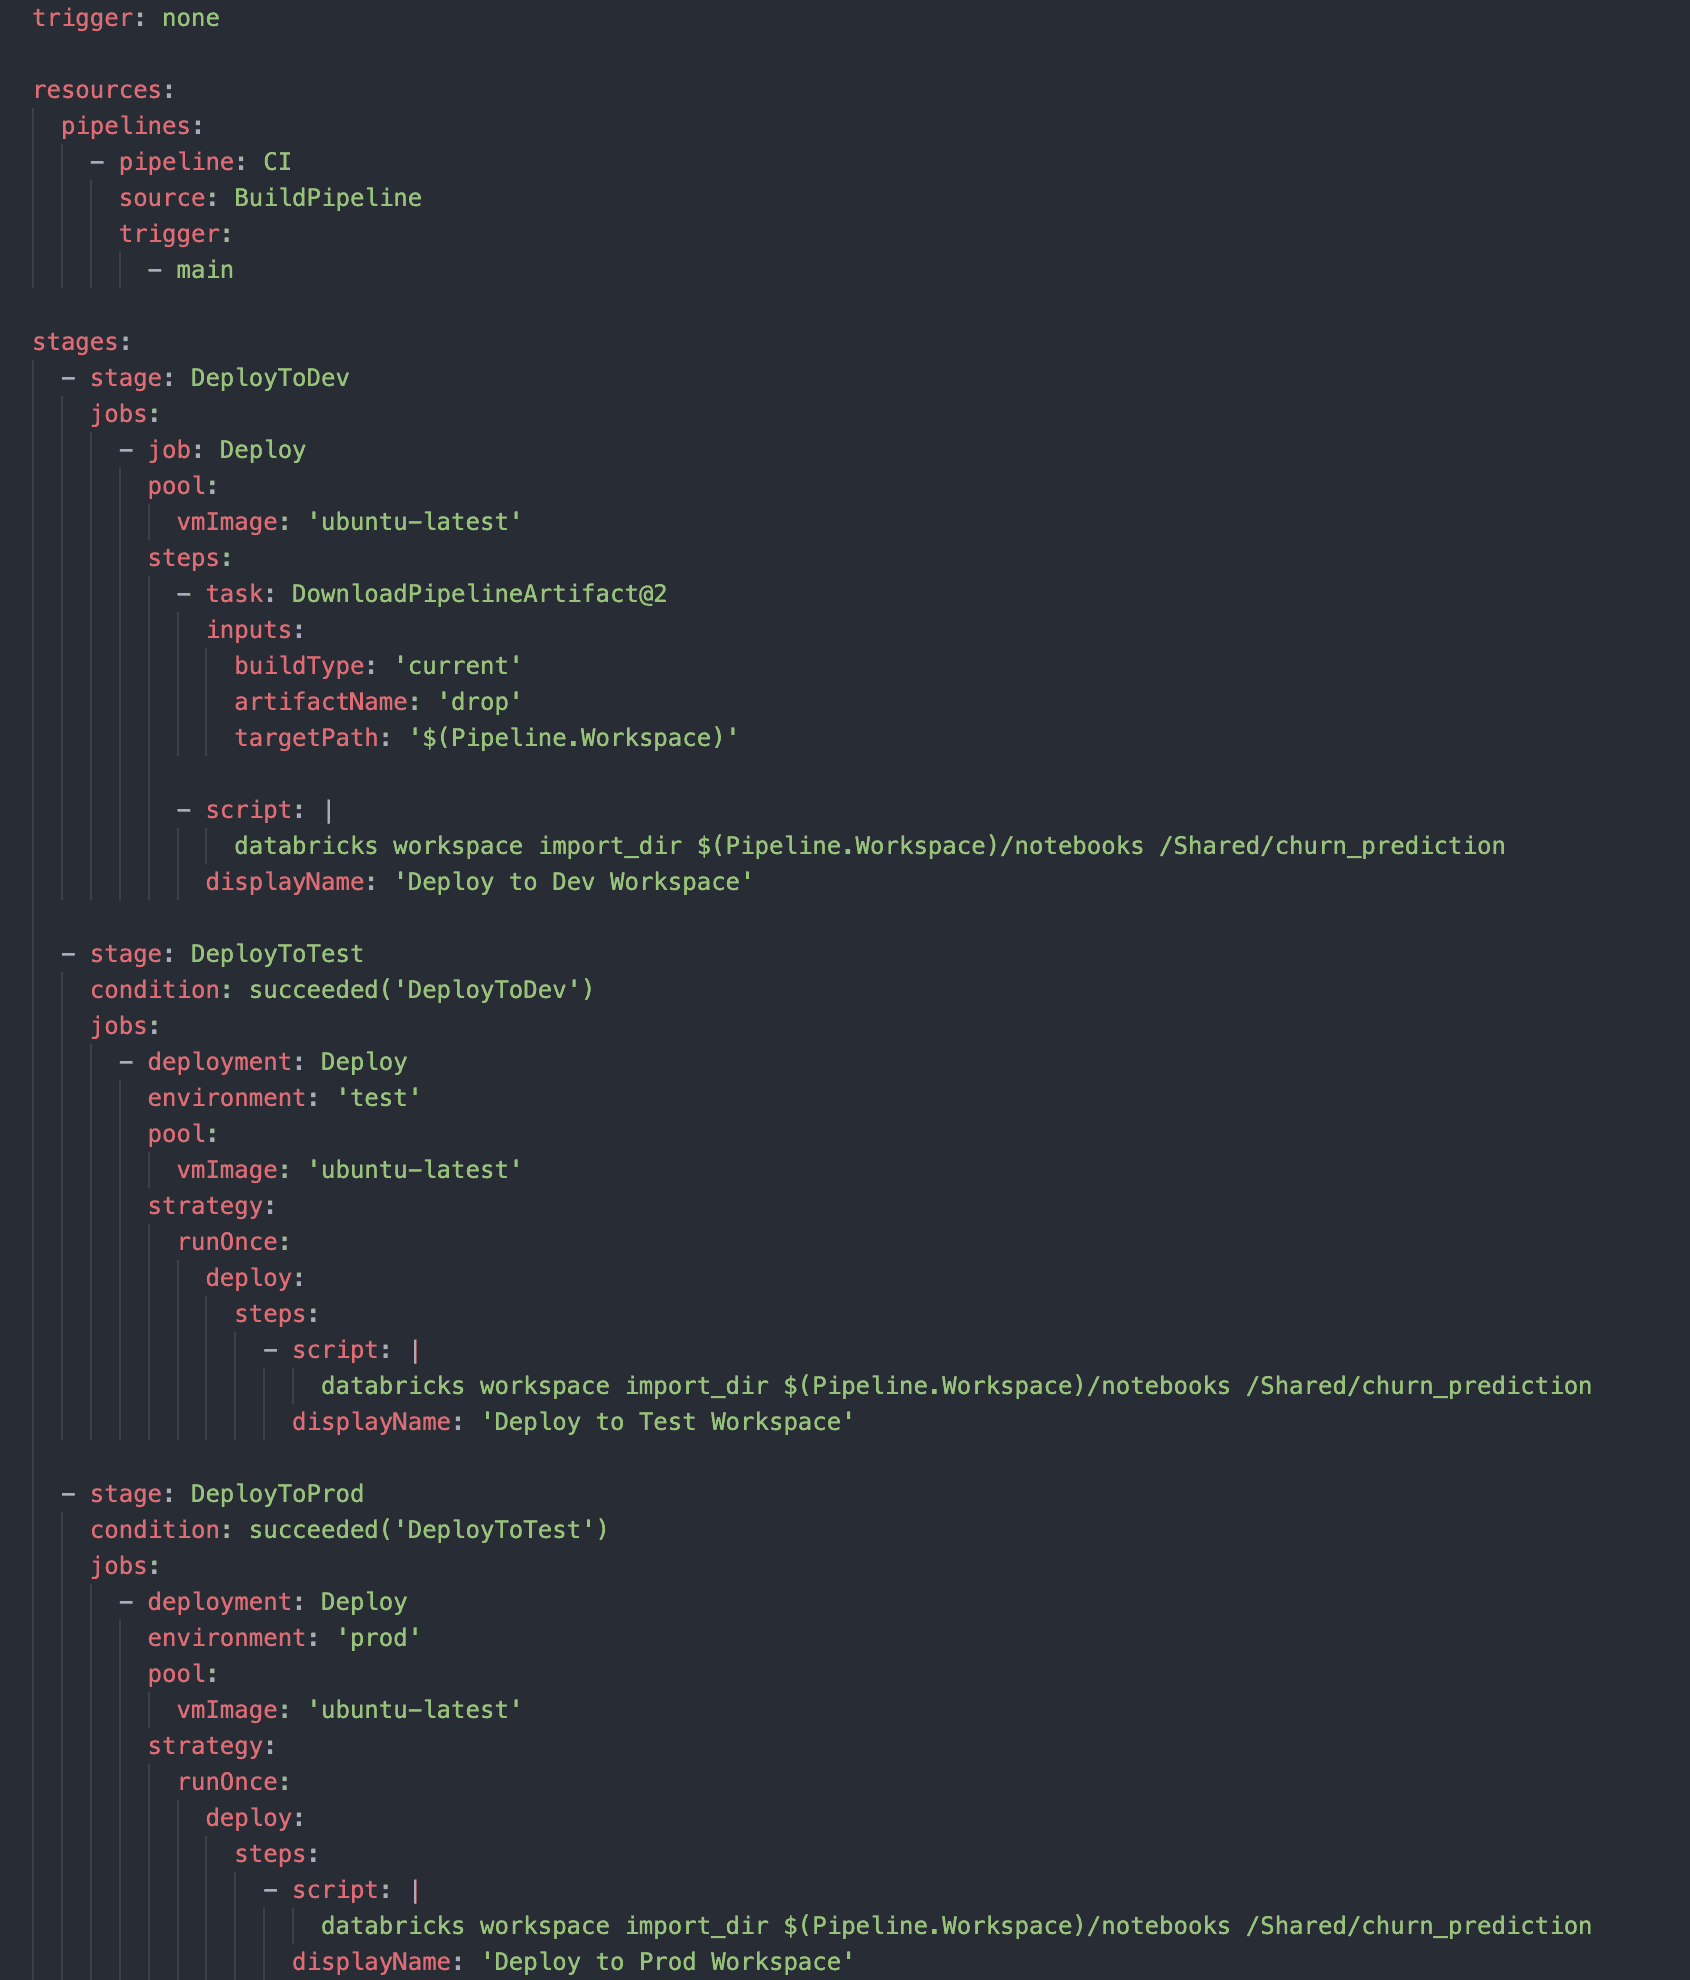
This pipeline demonstrates a staged deployment process with separate stages for dev, test, and prod environments, including approval gates between stages.
Automate Infrastructure Deployment
Now that we’ve set up a code repository and a code pipeline, we’re going to use that same CI/CD capability to deploy necessary infrastructure for use in the environment.
Using Infrastructure as Code (IaC) offers several benefits over manual UI/console configuration:
- Version Control: IaC files can be versioned, allowing you to track changes over time.
- Consistency: Ensures that environments are identical across dev, test, and prod.
- Automation: Can be integrated into CI/CD pipelines for automated deployments.
- Documentation: The code itself serves as documentation of your infrastructure.
- Scalability: Easily replicate or modify environments as needed.
In general, you should use infrastructure as code as the mechanism to deploy any resources destined for use post-development. That is, those resources that will be used in test, integration, or production environments. Creating the IaC code itself should be done in the development environment and when ready, should move through the development CI/CD pipeline just like any code.
- Infrastructure as Code: Use Terraform or Azure Resource Manager (ARM) templates to define your Databricks infrastructure.
- Pipeline Integration: Integrate these scripts into your Azure DevOps pipelines to automatically deploy and update new infrastructure components.
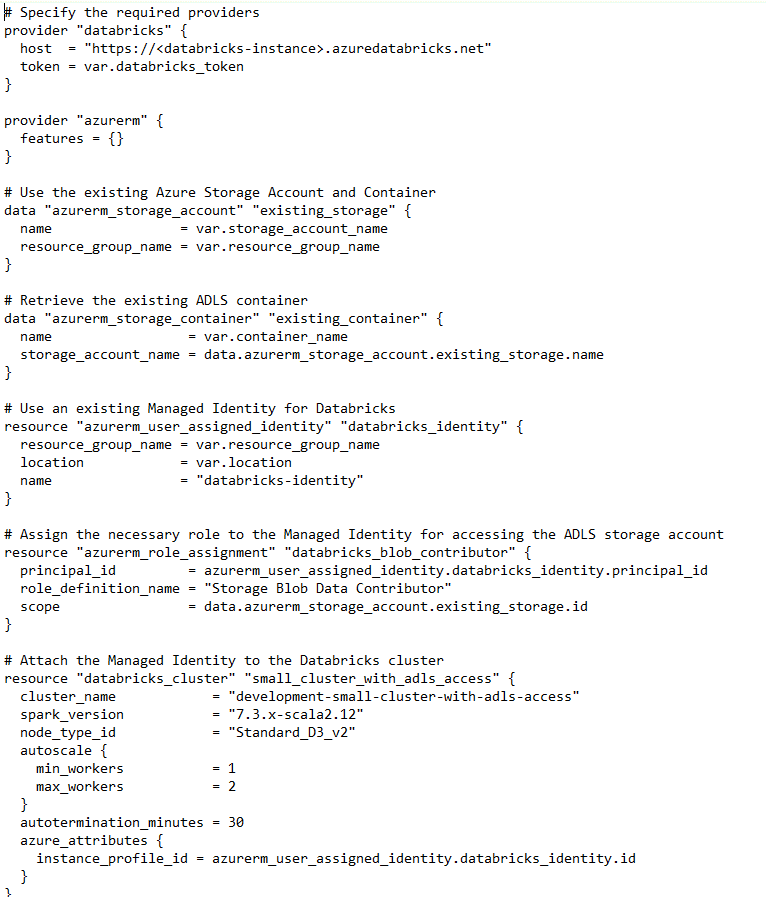
The following example contains two files:
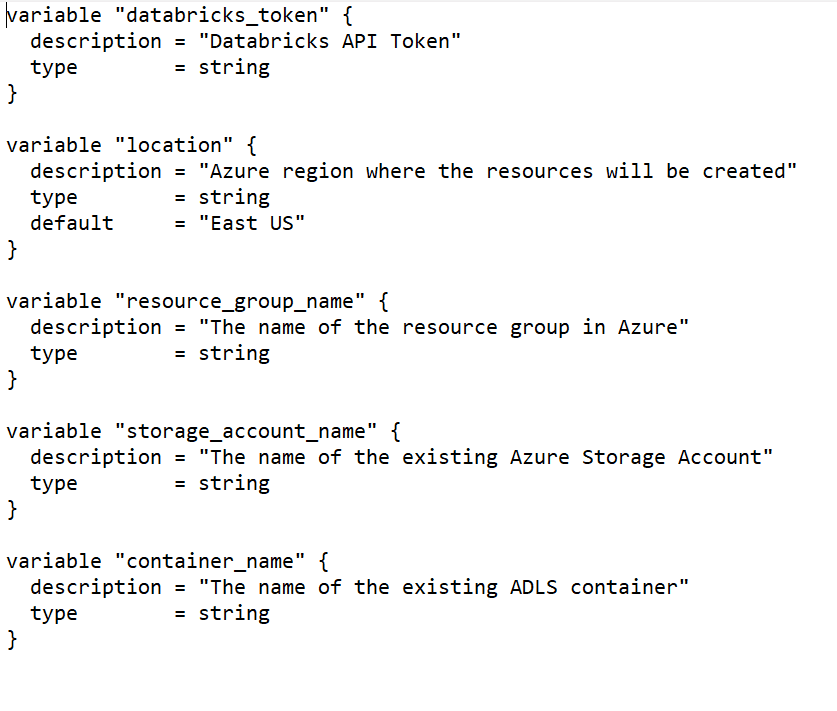
File One: The first is the Terraform code for deploying a small cluster; we also configure the access permissions for the new cluster to access an existing cloud (in this case, Azure) storage account. The details of the storage account change as this code is promoted from dev to test and production, so those details are externally stored in file two.
File Two: This file contains the information that will change as the cluster code is migrated from environment to environment. In this case, it will point to the development storage account, which would be swapped out for test and production accounts by the code pipeline in the variables file as appropriate:
This Terraform code defines a new small compute cluster in Azure, allowing for consistent and repeatable infrastructure deployment across environments. The same process should be used for defining workspaces, setting access permissions, etc.
Looking Ahead: Complex Environments
As your organization grows, you may need to adopt more complex environment setups, such as:
- Multi-Region Deployments: Deploy Databricks workspaces across multiple regions for disaster recovery and latency optimization.
- Advanced Security: Implement advanced security features such as network isolation, customer-managed keys, and fine-grained data permissions.
- Data Governance: Use tools like Unity Catalog to enforce data governance policies across your Databricks environment.
- Scalable Architectures: Architect your environment to support high-availability clusters and large-scale data processing workloads.
By following these steps and planning for future growth, you can transition from a Databricks sandbox to an enterprise-ready environment that supports your organization’s data-driven initiatives. The key is to start with a solid foundation and continuously evolve your configuration to meet changing business needs.
To learn more, get in touch with AHEAD today.
Contributing Authors:
Matt Sweetnam, Service Delivery Director
Nate Sohn, Senior Technical Consultant
Bellala Reddappa Reddy, Senior Technical Consultant

 ;
; ;
; ;
;