Introduction
There are numerous ways to automate the provisioning of an EKS cluster, such as using popular infrastructure as code tools like AWS CloudFormation and Terraform, leveraging CLI tools like AWS CLI, or utilizing the open source tool known as eksctl. Each of these tools can accomplish the simple task of provisioning a very basic cluster. However, getting your Kubernetes cluster up and running on AWS takes a bit more work than simply provisioning the cluster. Among the most important tasks is configuring the IAM role mapping for Kubernetes users and your cluster workload service accounts. Fortunately, both Terraform and eksctl can help accomplish this. Yet another crucial task is configuring the cluster to be production-ready. This involves configuring the cluster authorization via role-based access control (RBAC), creating namespaces and service accounts for your workloads, setting resource quota and limit ranges, and establishing some level of pod security as well as network policies. All of these things can be done with the Kubernetes Terraform provider. For open source users, eksctl is a popular tool to provision clusters, but it has some drawbacks. The first is using eksctl to configure IAM role mapping of Kubernetes users with the create iamidentitymapping subcommand. This subcommand updates a ConfigMap that maps a Kubernetes user or group to an IAM role. However, running the subcommand multiple times with the same IAM role and Kubernetes user or group will result in duplicate entries in the ConfigMap. This is very likely to happen when deployed in a pipeline to automate this task. eksctl has another subcommand, create iamserviceaccount, that will map IAM roles to the Kubernetes service account. This is what allows your workloads to make API calls to AWS resources. This subcommand requires you to provide an IAM policy that will be attached to an auto-generated IAM role. One drawback here is that some organizations may prefer to have more control over IAM role creation and likely already have some automation in place to manage IAM as a whole. Another is that you must have created your cluster with eksctl due to the fact that eksctl generates a CloudFormation stack under the hood and this subcommand will add on to that existing stack. Terraform has more flexibility when it comes to managing IAM role mapping and can overcome the drawbacks encountered when using eksctl. If you are already using Terraform to manage your IAM overall, this will enable a more seamless integration into your existing toolset and pipelines.Prerequisites
To implement the instructions in this post, you will need the following:Assumptions
- You have a local AWS credentials file configured with proper permissions to deploy all resources in the Terraform scripts.
Architecture
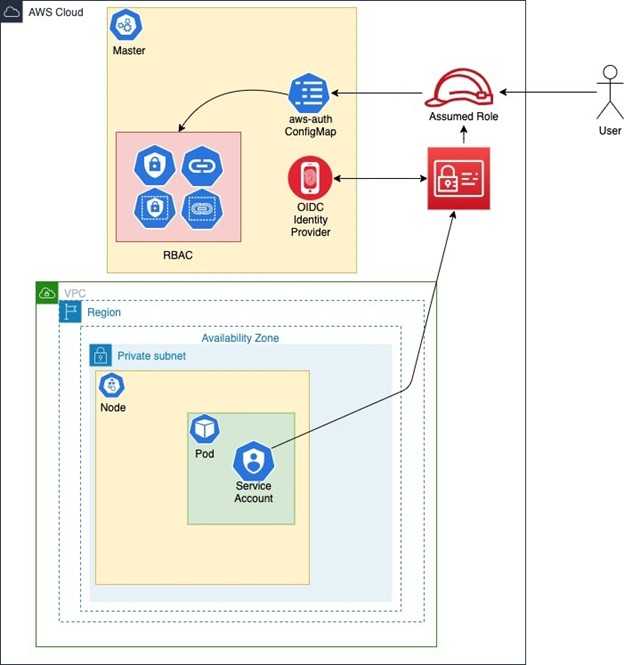
In this walkthrough, we will discuss the following architecture for EKS IAM role mapping automation:
Overview
- Install Terraform
- Clone GitHub Repository
- Provision Amazon EKS Cluster
- Test Kubernetes Authorization
- Test Kubernetes Service Account
1. Install Terraform
Download and install Terraform on your machine of choice. Terraform comes as a single binary; to install, simply unzip the downloaded version and place it in a directory on your systems PATH. To use the AWS Terraform provider, you must have AWS credentials in the form of an access key/secret access key or IAM instance profile attached to an EC2 instance.2. Clone GitHub Repository
The Terraform code can be found in this GitHub repository: This repo consists of the following files:iam_roles.tf
- This file shows examples of how to create IAM Roles for both Kubernetes users and Service Accounts.
- Kubernetes users must update the local variable role_to_user_map. This is a local map of the IAM Role (external_developer) to the Kubernetes user (developer). The Kubernetes username is arbitrary and will see how it ties into the cluster later.
locals {
role_to_user_map = {
external_admin = "admin",
external_developer = "developer"
}
- Notice the inline policy of the external roles only has permission on “eks:DescribeCluster.” This is because you have to make this API call in order to generate your local kube config file. After this, you communicate directly with the EKS cluster API and not AWS APIs. This role should be used for EKS authentication only – not for other AWS resources.
- The last thing this file does is enable the cluster’s OICD provider as an IAM identity provider. This is for use by the cluster service accounts when they assume IAM roles. It establishes trust between the cluster and IAM. Find more information here.
resource "aws_iam_openid_connect_provider" "eks-cluster" {
client_id_list = ["sts.amazonaws.com"]
thumbprint_list = [data.tls_certificate.cluster.certificates[0].sha1_fingerprint]
url = module.eks.cluster_oidc_issuer_url
}
main.tf
- This file implements terraform-aws-eks module found here: https://github.com/terraform-aws-modules/terraform-aws-eks. You can refer to this repo for documentation on any additional variables you’d like to override.
provider.tf
rbac.tf
- This file configures user authorization in the cluster by implementing a Kubernetes role and Kubernetes role binding. In the kubernetes_role_binding resource, take a look at the subject section. The username here is the arbitrary name we used in the iam_roles.tf file.
service-accounts.tf
- This file is where we create our Kubernetes service accounts. This service account will be attached to your running workload pod. The annotation is a Kubernetes construct – this is how we map IAM roles to service accounts. The IAM role here was also created in the iam_roles.tf file.
Example:
annotations = {
"eks.amazonaws.com/role-arn" = aws_iam_role.eks-service-account-role.arn
}
terraform.tfvars
- At a bare minimum, the variables here need to have values provided. For a list of currently supported EKS versions, visit: https://docs.aws.amazon.com/eks/latest/userguide/kubernetes-versions.html
Variables.tf
To clone the repository, run the following command from the terminal:3. Provision Amazon EKS Cluster
In the terminal where you performed the clone repository, change the directory to terraform-aws-eks-2.0 directory. In your terminal, run the following commands:cd terraform-aws-eks-2.0 terraform init terraform plan -out tf.out terraform apply tf.out
4. Test Kubernetes Authorization
Once Terraform has finished provisioning the cluster, you must obtain a kube config file in order to interact with the Kubernetes API. In your terminal, run the following command:aws eks update-kubeconfig --name cluster_name --region your_aws_region
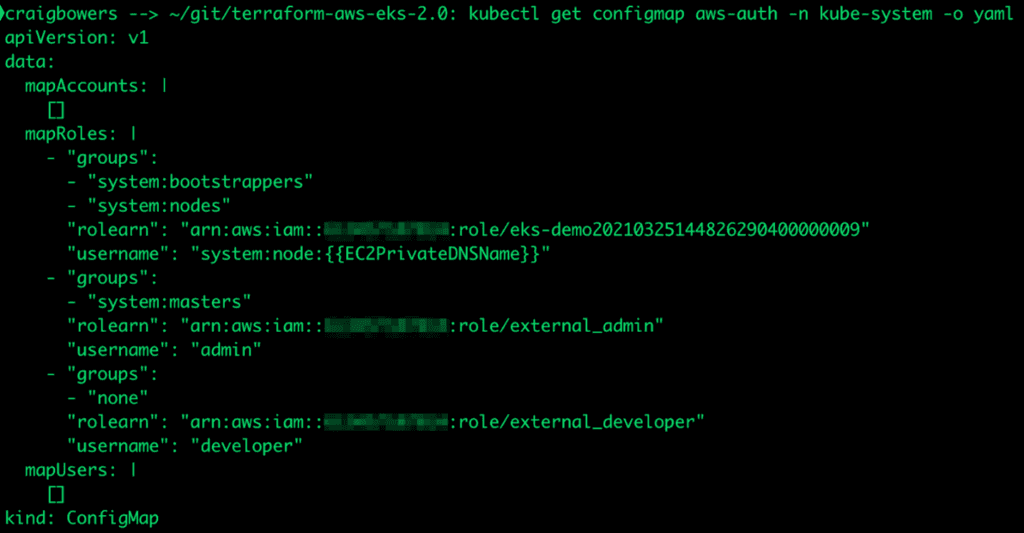
Review the aws-auth configmap resource. In your terminal, run the following command:
kubectl get configmap aws-auth -n kube-system -o yaml

aws sts assume-role --role-arn arn:aws:iam::111222333444:role/external_developer --role-session-name dev


Update your Kube config as the assumed user/role and be sure to include the profile name from the AWS credentials file. In your terminal, run the following command:
aws eks update-kubeconfig --name cluster_name --region your_aws_region --profile eks

If we try to view the aws-auth ConfigMap again, you’ll see that we get an error. That’s because in the rbac.tf file, we only gave the developer user access to view specific resources in the default namespace and here, we are trying to view a ConfigMap in the kube-system namespace. In your terminal, run the following command:
kubectl get configmap aws-auth -n kube-system -o yaml

If we try to view services in the default namespace, you will see that we do have permission to do that.
In your terminal, run the following command:
kubectl get services -n default

5. Test Kubernetes Service Account
Once again, we need to update the AWS credentials file and remove the eks profile we previously added. The external_developer user only has read access, and we will need some form of write permission to deploy a pod to the cluster. Afterwards, we need to update our kube config file so that our login is no longer associated with the eks profile. In your terminal, run the following command:aws eks update-kubeconfig --name cluster_name --region your_aws_region

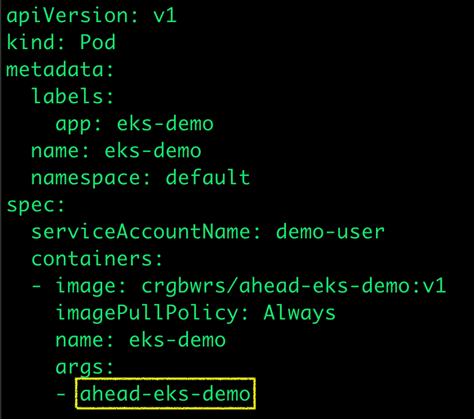
After updating the bucket name, run the following command:
kubectl apply -f pod-test/pod.yaml
kubectl get pods -n default
kubectl logs eks-demo -n default

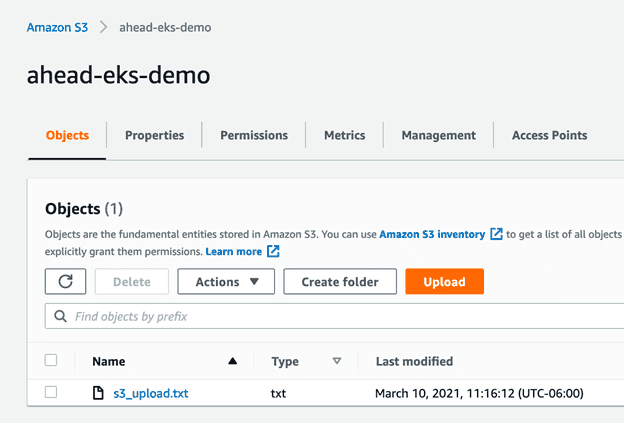
You can also go to the AWS S3 console to see the uploaded file.

